Battery switch on travel trailer function is crucial for managing your RV’s power. Understanding how to use this switch correctly ensures safe and efficient operation of your trailer’s electrical system. This guide will cover various switch types, wiring diagrams, troubleshooting tips, and important safety precautions to keep you powered up and safe on the road.
We’ll explore the different types of battery switches (like 1-2-both and 1-2-off), showing you how to connect and disconnect your house batteries safely. We’ll also delve into common problems, like blown fuses or corrosion, and offer solutions to get you back on track. Finally, we’ll cover best practices for maintaining your battery system and selecting the right switch for your needs.
Understanding Battery Switch Functionality in Travel Trailers: Battery Switch On Travel Trailer Function
Your travel trailer’s battery switch is a crucial component, acting as the central control for your trailer’s power system. It allows you to manage the flow of power from your trailer’s batteries to various appliances and systems, offering flexibility and protection. Understanding its function is key to safe and efficient RVing.Battery switches in travel trailers primarily serve to disconnect your house batteries from the rest of the electrical system.
This is vital for preventing battery drain when your trailer is stored for extended periods or to isolate a faulty battery. They also enable you to choose which battery bank (if you have two) powers your trailer’s systems. This is particularly useful if you have a dedicated deep-cycle battery for house functions and a starting battery for your tow vehicle.
Types of Battery Switches
Several types of battery switches are common in travel trailers. The most prevalent are the 1-2-Both switches and the 1-2-Off switches. A 1-2-Both switch allows you to select either battery 1, battery 2, or both batteries to power your trailer. A 1-2-Off switch offers the same battery selection options but also includes an “Off” position to completely disconnect both batteries from the trailer’s electrical system.
Some more advanced switches incorporate additional features like a battery disconnect relay for added safety and control.
Internal Workings of a Typical Battery Switch
A typical battery switch, regardless of the specific type, utilizes a rotary selector mechanism to connect or disconnect the batteries from the circuit. Inside the switch, heavy-duty copper contacts make and break the connections. The switch itself is robustly constructed to handle the high current demands of the trailer’s electrical system. The selector lever moves the internal contacts to the desired position (Battery 1, Battery 2, Both, or Off), establishing the appropriate electrical path.
A properly installed and maintained switch ensures a safe and reliable connection.
Operating a Battery Switch: A Step-by-Step Guide
Before operating your battery switch, ensure you understand its markings. Locate the switch, typically found near your battery compartment.
1. Identify the switch positions
Familiarize yourself with the switch’s positions (e.g., 1, 2, Both, Off). The markings will vary slightly depending on the manufacturer.
2. Turn off all appliances
Before switching batteries, turn off all appliances and lights in your trailer to prevent power surges or unexpected behavior.
3. Select the desired position
So, you’re an audiophile who travels? Awesome! Check out this guide for setting up your audiophile travel setup – it’s got great tips on packing your gear safely. Then, once you’ve got your portable setup dialed in, head over to audiophile travel aetup for some killer recommendations on headphones and portable amps that’ll blow your mind on the go.
Remember, good sound doesn’t have to stay home!
Rotate the switch lever to the desired position. If you’re storing the trailer, select “Off” to completely disconnect the batteries. If you’re using the trailer, select “1”, “2”, or “Both” depending on your battery configuration and needs.
4. Verify the connection
After switching, take a moment to verify the functionality. Check that the appliances work as expected if you’ve selected a “1”, “2”, or “Both” position.
5. Regular maintenance
Periodically inspect your battery switch for any signs of corrosion, loose connections, or damage. Clean any corrosion with a wire brush and battery terminal cleaner. Replacing the switch if necessary is important for maintaining the safety and efficiency of your trailer’s electrical system.
Connecting and Disconnecting Batteries

Connecting and disconnecting your travel trailer’s house batteries to the battery switch is a straightforward process, but safety is paramount. Improper handling can lead to injury or damage to your equipment. This section details the correct procedure and emphasizes essential safety precautions.
The process involves manipulating the battery switch to isolate or connect the batteries to the trailer’s electrical system. This allows you to control power flow to the house systems, preventing accidental discharge or protecting against potential electrical issues. Always follow the manufacturer’s instructions for your specific battery switch and trailer setup.
Safety Precautions When Working with Batteries
Working with batteries requires careful attention to safety. Batteries contain corrosive chemicals and can generate explosive gases. Always wear appropriate safety glasses and gloves to protect yourself from acid splashes and potential burns. Ensure adequate ventilation to prevent the buildup of flammable hydrogen gas. Never smoke or use open flames near batteries.
If you are unsure about any aspect of the procedure, consult a qualified electrician.
Connecting and Disconnecting Battery Procedures
Before working with the batteries, turn off all power to the trailer’s electrical system. This usually involves turning off the battery switch itself. Locate the battery switch, typically near the batteries or inside a dedicated compartment. The switch will have clearly marked positions indicating whether the batteries are connected or disconnected. To connect the batteries, move the switch to the “on” or “connect” position.
To disconnect the batteries, move the switch to the “off” or “disconnect” position. Always visually confirm the switch position after making the change.
Planning your next adventure? Don’t forget the tunes! This audiophile travel aetup resource is a lifesaver for keeping your audio quality high, even when you’re miles from home. It covers everything from choosing the right headphones to protecting your equipment. And if you need more ideas on how to pack your precious audio gear, check out this other great guide on audiophile travel aetup for additional tips and tricks.
Maintaining Battery Connections to Prevent Corrosion
Corrosion on battery terminals is a common problem that can lead to poor connections and reduced battery life. Regular cleaning and maintenance can significantly extend the lifespan of your batteries and prevent costly repairs. Use a wire brush or terminal cleaner to remove any corrosion from the terminals and cables. Apply a thin layer of dielectric grease to the terminals after cleaning to prevent future corrosion.
Tighten all connections to ensure a secure fit. Inspect the connections regularly for signs of corrosion or looseness.
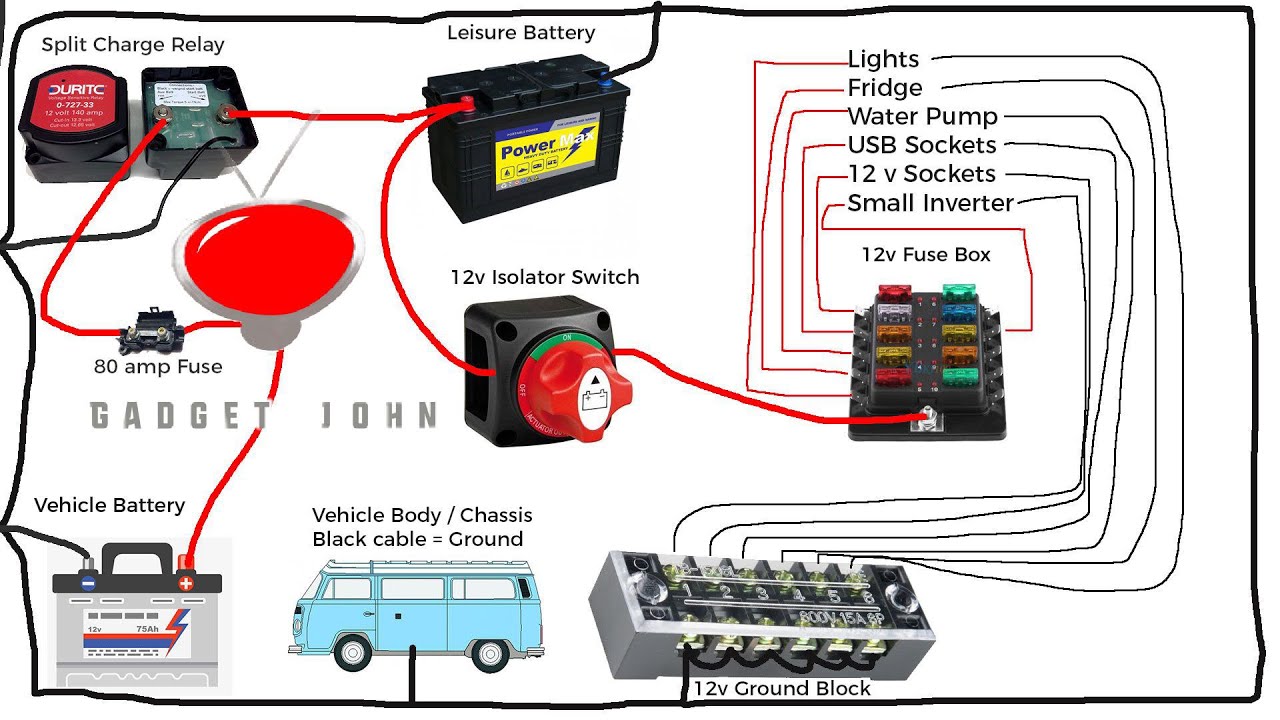
Typical Battery Switch Wiring Diagram
The following table illustrates a typical wiring diagram for a battery switch setup. Remember that specific wiring may vary depending on your trailer’s configuration. Always consult your trailer’s wiring diagram and owner’s manual before attempting any wiring modifications.
| Component | Wire Color (Example) | Battery 1 Connection | Battery 2 Connection |
|---|---|---|---|
| Battery 1 (Positive) | Red | Connected to Switch Terminal A | – |
| Battery 1 (Negative) | Black | Connected to Chassis Ground | – |
| Battery 2 (Positive) | Red | – | Connected to Switch Terminal B |
| Battery 2 (Negative) | Black | – | Connected to Chassis Ground |
| Switch Terminal C (Output) | Red | Connected to Trailer’s Electrical System | Connected to Trailer’s Electrical System (when switch is ON) |
| Switch Position: OFF | N/A | Disconnected from Trailer System | Disconnected from Trailer System |
| Switch Position: ON | N/A | Connected to Trailer System | Connected to Trailer System |
Troubleshooting Common Battery Switch Issues
Dealing with a faulty battery switch in your travel trailer can be frustrating, leaving you without power when you need it most. This section will guide you through identifying, diagnosing, and resolving some common problems. We’ll cover the most frequent issues and provide practical solutions to get you back on the road quickly.
Common Battery Switch Problems and Diagnostics, Battery switch on travel trailer function
Several issues can arise with your travel trailer’s battery switch. These often manifest as a complete lack of power, blown fuses, or visible signs of corrosion. Understanding the potential causes and how to check them is key to effective troubleshooting. A systematic approach, starting with the simplest checks, is recommended.
Methods for Diagnosing Battery Switch Issues
Let’s tackle diagnosing these issues step-by-step. First, visually inspect the battery switch itself. Look for any obvious signs of damage, such as loose connections, corrosion on the terminals, or a broken switch lever. Clean any corrosion you find with a wire brush and baking soda solution. Next, check your fuses.
Blown fuses are a common culprit for power loss. Locate the fuse box and carefully inspect each fuse, replacing any that are blown. If the problem persists, use a multimeter to check the voltage at the battery terminals and at the switch itself. This will help pinpoint whether the problem is with the battery, the switch, or the wiring.
A low voltage reading at the battery indicates a battery problem; a low reading at the switch, after confirming battery voltage, suggests a problem with the switch or wiring between the battery and the switch.
Solutions for Resolving Common Problems
Once you’ve identified the problem, the solution is usually straightforward. Replacing a blown fuse is simple, requiring only a replacement fuse of the correct amperage. Cleaning corroded terminals often restores functionality. However, if the switch itself is faulty, you’ll need to replace it. This may involve disconnecting the wiring, carefully noting the connections before removing the old switch, and installing the new one, ensuring all connections are secure and corrosion-free.
If wiring issues are suspected, a qualified electrician should be consulted.
Troubleshooting Flowchart
Before starting any troubleshooting, always disconnect the negative battery terminal to ensure safety.
- No Power:
- Check all fuses. Replace any blown fuses.
- Inspect battery switch for corrosion. Clean terminals if necessary.
- Check battery voltage. Charge or replace battery if needed.
- If the problem persists, test voltage at the switch input and output. Low voltage at the output indicates a switch or wiring problem.
- Intermittent Power:
- Inspect battery switch for loose connections. Tighten as needed.
- Check for corrosion on terminals and clean if necessary.
- If the problem continues, consider replacing the battery switch.
- Blown Fuses (repeatedly):
- Check for short circuits in the wiring. A qualified electrician should check this.
- Ensure correct amperage fuses are used.
- Inspect the battery switch for internal damage. Replacement may be necessary.
Safety Considerations and Best Practices
Working with your travel trailer’s battery system requires careful attention to safety. Improper handling can lead to serious injury from electrical shock, burns, or explosions. Understanding and following safety protocols is crucial for protecting yourself and your equipment.Proper battery switch operation is essential for preventing electrical hazards. Misuse can lead to short circuits, sparking, and even battery fires.
Always double-check the switch position before performing any electrical work on your trailer. Similarly, incorrect connection or disconnection of batteries can result in arcs, causing damage to the system and potentially injuring you.
Battery Handling and Maintenance
Safe battery handling involves several key steps. Always wear appropriate personal protective equipment (PPE), including safety glasses and gloves. Never work on batteries near open flames or sparks. When cleaning battery terminals, use a wire brush and baking soda solution to neutralize any acid spills. Inspect batteries regularly for corrosion, damage, or leaks.
If you notice any issues, address them promptly to prevent potential problems. Remember to properly dispose of old or damaged batteries according to local regulations; many auto parts stores accept used batteries for recycling.
Safety Guidelines for Battery Switches and Batteries
Safe operation of your travel trailer’s battery system hinges on following established safety guidelines. Ignoring these can have serious consequences.
- Always disconnect the negative (-) battery terminal first when working on the battery system, and reconnect it last.
- Wear safety glasses and gloves when handling batteries or working with the battery switch.
- Never work on batteries in a confined space with poor ventilation.
- Ensure proper ventilation when charging batteries to avoid the buildup of explosive hydrogen gas.
- Keep batteries clean and dry; corrosion can lead to poor connections and electrical hazards.
- Inspect battery cables and connections for damage or corrosion regularly. Replace any damaged components immediately.
- Use insulated tools when working near batteries and electrical connections.
- Never short circuit battery terminals. This can create intense heat and potentially cause a fire.
- Before making any changes to your battery setup, consult your trailer’s manual or a qualified technician.
- Familiarize yourself with the location of your trailer’s main battery disconnect switch and know how to use it in emergency situations.
Mastering your travel trailer’s battery switch is key to a smooth and enjoyable RV experience. By understanding its function, practicing safe operation, and performing regular maintenance, you can prevent electrical issues and ensure your batteries are always ready to power your adventures. Remember, safety first – always disconnect batteries before working on the system. Happy travels!
FAQ Insights
What happens if I leave my battery switch in the “off” position for a long time?
Leaving the switch off for extended periods prevents battery drain from parasitic loads, protecting your batteries. However, ensure your trailer’s charging system can still charge your batteries if you’re using solar or shore power.
Can I use a different type of battery switch than what came with my travel trailer?
Yes, but ensure the replacement switch has the correct amperage rating for your battery bank. Improper amperage can lead to overheating and damage. Consult an RV electrician if unsure.
How often should I inspect my battery connections?
Inspect your battery connections at least every three months, or more frequently in humid climates, to check for corrosion and tighten loose connections. Clean any corrosion with a wire brush and baking soda solution.
My battery switch is making a clicking noise. What’s wrong?
A clicking noise often indicates a low battery voltage or a problem with the switch itself. Check your battery voltage and inspect the switch for any loose connections or damage. If the problem persists, seek professional help.
